Monday, 2 August 2021

How to Integrate GraphQL API with Blue Prism

 GraphQL API - Blue Prism Integration
This post discusses how to integrate GraphQL API with Blue Prism using a sample graphQL API and Utility-HTTP VBO in Blue Prism.

Consider the following API: 
https://api.spacex.land/graphql/

First Let's try fetching simple data from the API. For this, we need the AddressURL, method, body.
In this example API, there are some details about rockets, that we are going to query using the format defined by the GraphQL API.

GraphQL API allows us to fetch the required fields by specifying the field names as a nested string containing curly braces ({,}), which represents the hierarchy, as a  query parameter inside the body part of the request and calling the POST method of HTTP on the URL, is shown below as Input.
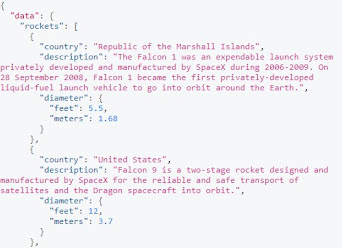
The response of the above request is shown as output below

For Example:

Input:                    


Output:


To Simulate the above API request in Blue Prism, I am making use of Utility-HTTP VBO.
Set the input parameters as follows:
Action: Utility-HTTP
Page Name: Post JSON
    Input Parameters:
  •    AddressURL:  https://api.spacex.land/graphql/
  •   JSON: payload
Output Parameters:
  •   Result
Here the payload variable is the data item that holds the GraphQL Query. And the query is supposed to be passed as JSON data.
To represent the hierarchy of the database objects and to distinguish between table names and field names and properties, we use multiline text.
As this query parameter and its value is passed in JSON format, we need to explicitly indicate the newline characters using escape sequences like \n.

And also to pass the JSON data in a calculation stage of blue prism we need to escape the double quotations as well. This can be done by adding two successive quotes.

{
    "query":"{
                          rockets {
                                country
                                description
                                diameter {
                                               feet
                                              meters
                                               }
                                          }
                            }"
}

We need to escape all the new lines and double quotes present in the query using \n and "" and the query should be written in BluePrism as:


Following is a sample process to get the data from Graph QL API.


Set Parameters Multi calc stage looks like this:


Pass the Address URL and Payload values as Inputs to the Post JSON Action Stage. Set the output parameters to receive the response.


Now Set next stage at Start Action and run the process. The output will be stored in the Result data item in the JSON format as shown below.

API Response:


Thank you!

Tuesday, 27 July 2021

Query GraphQL API using JavaScript/JQuery

How to access GraphQl API using JQuery(AJAX).

Let's consider this sample GraphQL API:

Url: https://api.spacex.land/graphql/

Method: POST

Headers: {'Content-Type': 'application/json'}

Data:   provide your select list in JSON format like this: 

query:`{ 

                 launchesPast {

mission_name

launch_site {

  site_name_long

}

  }

}`

    }

You can quickly check its working by creating the below HTML file:

graphQlTest.html:
<html>
<head>
</head>
<body>
<button onclick="callAPI()"> Execute </button>
<p id="response-box"></p>
<script src="https://ajax.googleapis.com/ajax/libs/jquery/3.5.1/jquery.min.js"></script>
    <script>
		function callAPI(){
		var url="https://api.spacex.land/graphql/";
		var method="POST"
		var body=JSON.stringify({ query:`{
				  launchesPast {
					mission_name
					launch_site {
					  site_name_long
					}
				  }
				}`});
		var headers={
		'Content-Type': 'application/json'
		}
		console.log("execution started");
            $.ajax({
                'method': method,
                'url': url,
		'headers':headers,
		'data':body,
                'success': function(data){
                    document.getElementById("response-box").innerHTML = JSON.stringify(data,undefined,2);
                }
            });

           }
	</script>  
</body>
</html>


The output of the HTML page looks like this:


On clicking the execute button, a javascript function associated with the button triggers the API call. The response from the API is in JSON format as follows:


Thank you!


Tuesday, 20 July 2021

CRUD operation on Rest API with Token based authentication

CRUD Operations on REST API with Token Authentication.

CRUD stands for Create, Read, Update, Delete which are most basic operations performed on any database. In REST API, we interact with database server using HTTP methods like GET, POST, PUT, DELETE etc,. to perform these operations. While dealing with any API, authentication plays a key role in restricting the access to authorized users. In the following example, I am using a token based authentication(JWT token to be more precise).

I am going to use two database tables to demonstrate all the 4 CRUD Operations of REST API using the concept of Token-based authentication.

For this I am using a free rest API:

Base url: https://restapiplayground.herokuapp.com

Let's understand the table structure before writing or reading data using API.

Database Schema:

There are two tables -

1.User

2.Todo

Schema of the User table looks like this:

  •     id=db.Column(db.Integer,primary_key=True)
  •     name=db.Column(db.String(100))
  •     public_id=db.Column(db.String(50),unique=True)
  •     password=db.Column(db.String(80))
  •     admin=db.Column(db.Boolean)

And schema of the Todo table looks like this:

  •     id=db.Column(db.Integer, primary_key=True)
  •     text=db.Column(db.String(100))
  •     complete=db.Column(db.Boolean)
  •     user_id=db.Column(db.Integer)
Steps to Access API:
  1. Generate a token using login url with the help of username and password.Request is shown in (fig.1) and Response is shown in (fig.2).Once the token is generated, it is valid for next 30 minutes.
  2. Pass this token as {"x-access-token":<token-value>} in JSON format in the headers for all the queries you perform on users and todo table.
  3. Set the parameters required for the API call like url, method,headers,Request- body.
  4. Send the request with appropriate method and parameters. Response is received from the server.

How to generate a token using login url with the help of username and password?

To perform any operations on these tables, you need to obtain a token.
Prerequisites: Need to have Login Access to the application with Basic Authentication i.e, Username, Password.
Request looks like this:


Fig. 1


Response looks like this:


Fig. 2

 
Once we get the token we can perform all the operations defined on these tables using the rest api.

Following endpoints are defined on User Table:

GET: 

1. To get all the users :

    URL:  https://restapiplayground.herokuapp.com/users
    method: GET
    Headers : pass token in json format with name "x-access-token"

    Request 
Response


2. To get a Specific User:

    URL:  https://restapiplayground.herokuapp.com/users/<user-id>
    method: POST
    Headers : pass token in json format with name "x-access-token"

                                        
                                                  Request


                                                    Response


POST

 1. Create a new User

    URL:  https://restapiplayground.herokuapp.com/users
    method: POST
    Headers : pass token in json format with name "x-access-token"
    Request body: provide data in format json format as shown below.


   Request


Response


2. Update existing User

    URL:  https://restapiplayground.herokuapp.com/users/<user-id>
    method: POST
    Headers : pass token in json format with name "x-access-token"
    Request body: provide updated details in format json format as shown below.


Request


Response

PUT:

1. Promote existing User as Admin (in this example)

    URL:  https://restapiplayground.herokuapp.com/users/<user-id>
    method: PUT
    Headers : pass token in json format with name "x-access-token"
   
                                            Request


Response


DELETE:

1. Delete existing User

    URL:  https://restapiplayground.herokuapp.com/users/<user-id>
    method: DELETE
    Headers : pass token in json format with name "x-access-token"
                                                         
                                                    Request


                                                    Response


Following endpoints are defined on Todo Table:

GET:

1. Get all the todos

    URL:  https://restapiplayground.herokuapp.com/todos
    method: GET
    Headers : pass token in json format with name "x-access-token"

                                                     Request
Response


2. Get a Specific todo 

    URL:  https://restapiplayground.herokuapp.com/todos/<todo-id>
    method: GET
    Headers : pass token in json format with name "x-access-token"

                                                Request


Response


POST

1. Create a new todo

    URL:  https://restapiplayground.herokuapp.com/todos
    method: POST
    Headers : pass token in json format with name "x-access-token"
    Request body: provide data in json format as shown below.


                                            Request


Response

2. Update an existing todo

     URL:  https://restapiplayground.herokuapp.com/todos/<todo-id>
    method: POST
    Headers : pass token in json format with name "x-access-token"
    Request body: provide updated details in format json format as shown below.


                                               Request


                                                Response

PUT:

1. Marks the todo as completed (in this example).

    URL:  https://restapiplayground.herokuapp.com/todos/<todo-id>
    method: PUT
    Headers : pass token in json format with name "x-access-token"

Request


Response


DELETE:

1. Delete existing Todo

    URL:  https://restapiplayground.herokuapp.com/todos/<todo-id>
    method: DELETE
    Headers : pass token in json format with name "x-access-token"

Request
                                                                   
                                                                             Response


 That is it for this Article. you can try out the API console available in the below     link:  

                                OR

  POSTMAN Desktop Application  to work on this API.

 Please let me know if you have any queries. 

 Please write to me in the below contact form if you want a user 
 login to begin with.

                                         Thank you!


Friday, 16 July 2021

How to test a Rest API without any tools like postman

How to test a Rest API without Postman

Most of the time, we have the need to test the functionality of an API without a third-party tool, as installing an API testing software is not always allowed in an organization.

As we all know, web applications that interact with APIs generally use technologies like javascript, jquery, Ajax to do all the CRUD operations(Create, Read, Update, Delete) on data within the website.

Since web browsers are able to execute the javascript, no other software is required to be installed on the machine in order to query an API.

Let's get started with a small piece of code that can get the API data at the click of a button.

To demonstrate this, I am using the below public rest API:

http://jsonplaceholder.typicode.com/users/1

you can simply browse the above url to see the JSON data which we are going to fetch using our script.

Implementation: Create an HTML file TestApi.html as shown below and run it with any web browser.

1. Get Request (Without Authentication): 

TestApi.html


<html>
	<head>
		<title>Test API with JavaScript</title>
	<script>
		function callAPI(){
		var url="http://jsonplaceholder.typicode.com/users/1";		
		var method="GET";
		var xhreq=new XMLHttpRequest();
		xhreq.onload=function(){
			document.getElementById("userdata").innerHTML = this.responseText;			
			}
		xhreq.open(method,url);
		xhreq.send();
		}

	</script>
	</head>
	<body>
		<br>
		<center>
		Click the button get json data<br><br>
		<button onclick="callAPI()" class="btn" style="background-color:green; color:white;"> Get Data </button>
		</center>
		<p id="userdata"></p>
	</body>
</html>

The output of the above code looks like this:

After clicking the Get Data Button, json data is loaded on the web page as shown below:

 The output json data we are expecting is displayed on the screen.That's it.

                                            Thank you!


Tuesday, 8 September 2020

How to compare two text columns in excel for matches


We can use a simple formula to do this real quick.

Let’s say we have two columns data like this.

Now, we can write the formula in the C2 Cell as =A1=B1

Then Press enter and then drag the formula down until where you want the result. The columns is filled with TRUE if the value in the first column matches with value in the second column other wise FALSE.

This is the output of the formula.

Sunday, 6 September 2020

Compare two excel sheets and highlight the differences


Comparing two excel sheets for differences:

We can compare two excel Sheets for differences without any third party tool, just with the help of well known formulas.

This is achieved with the help of conditional formatting.

Steps:

1.Open the the workbook

2. Select the area of the worksheets in both of the excel files

Let's say Sheet1 looks like this.

And Sheet2 looks like this

There are some differences in both the sheets and we want to highlight those differences.

 For this we are using  conditional formatting formula for the selected ranges.

Click on conditional formatting on Home Tab. Select New Rule

Now Select "Use a formula to determine which cells to format" and Write the formula in the  Edit box as    =A1<>Sheet1!A1

Then click on Format button to select formatting options for highlighting. Here I want to highlight the differences in RED Colour. Select the colour you want and click OK.


Now the selected colour appears under formula like this.

4. Then click OK, the differences are highlighted with the format specified in the previous step.

Now you are able to see the differences highlighted in the red color.

How to Integrate GraphQL API with Blue Prism

 GraphQL API - Blue Prism Integration This post discusses how to integrate GraphQL API with Blue Prism using a sample graphQL API and Utilit...